
Core Data Migration in Swift: A Complete Guide
This guide covers everything you need to know about Core Data Migration in Swift, including model versioning, lightweight migration, manual mapping models, migration policies, common errors, CloudKit considerations, diagrams, and Apple-recommended best practices.
Introduction
Core Data is one of Apple’s most powerful frameworks for data persistence on iOS and macOS. It allows developers to model, manage, and persist data efficiently — but as your app evolves, so must your data model. This is where Core Data migration becomes essential.
When you change your Core Data schema — for example, adding new attributes, renaming entities, or changing relationships — the persistent store on your users’ devices must be updated to match the new model version. Without proper migration, your app will crash with errors like:
“The model used to open the store is incompatible with the one used to create the store.”
This guide explains everything you need to safely migrate Core Data models, from lightweight automatic migration to advanced manual migration using mapping models.
What Is Core Data Migration?
Core Data migration is the process of updating the persistent store’s schema when your data model changes.
Every Core Data project contains a data model file (.xcdatamodeld) that defines your entities, attributes, and relationships. Each change you make in that model — such as adding a property or renaming an entity — can make the existing on-disk data incompatible.
To fix this, Core Data provides two main migration strategies:
- Lightweight Migration — handled automatically by Core Data
- Manual (Heavyweight) Migration — when you need full control using a custom mapping model
Understanding Model Versions in Core Data
When you first create a Core Data model in Xcode, it starts with a single version (for example, Model.xcdatamodel). Over time, as your schema changes, you can create new versions.
Each version represents a specific schema definition that your app might use at different points in its lifecycle.
Adding a New Model Version
- In Xcode, select your
.xcdatamodeldfile - Go to Editor → Add Model Version…
- Name your new version (e.g.,
ModelV2) - Make the desired changes (such as adding an attribute)
- Set the new version as the Current Model Version
This preserves backward compatibility and enables safe migrations.
Core Data Migration Comparison
Lightweight vs Manual Migration
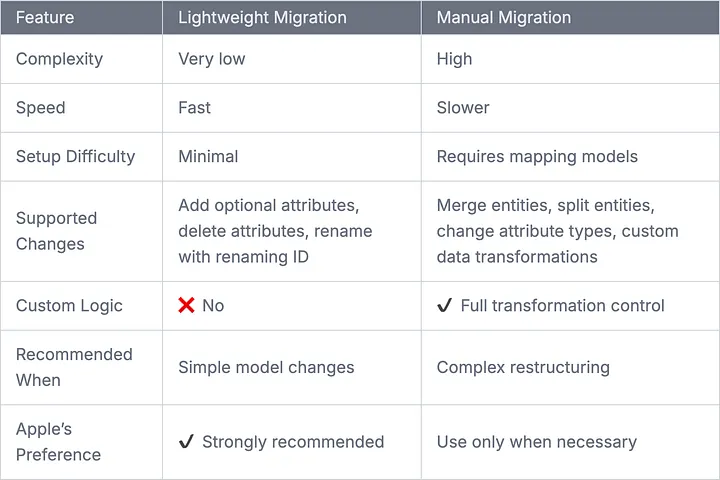
Lightweight Migration: The Simple and Safe Approach
For most use cases, lightweight migration is all you need.
Lightweight Migration Works When
- Adding optional attributes
- Adding optional relationships
- Deleting attributes
- Renaming using Renaming ID
- Marking attributes optional
Enabling Lightweight Migration
let container = NSPersistentContainer(name: "MyAppModel")

let storeDescription = container.persistentStoreDescriptions.first
storeDescription?.setOption(true as NSNumber,
                            forKey: NSMigratePersistentStoresAutomaticallyOption)
storeDescription?.setOption(true as NSNumber,
                            forKey: NSInferMappingModelAutomaticallyOption)

container.loadPersistentStores { description, error in
    if let error = error {
        fatalError("Unresolved error \(error)")
    }
}
Key Options Explained
-
NSMigratePersistentStoresAutomaticallyOption Attempts migration automatically.
-
NSInferMappingModelAutomaticallyOption Lets Core Data infer mapping between versions.
Example: Adding an Attribute
Original Model
entity User {
    name: String
}
Updated Model
entity User {
    name: String
    age: Int16?
}
After relaunching the app, Core Data migrates the store automatically.
Manual (Heavyweight) Migration: When You Need Full Control
Manual migration is required for complex changes such as:
- Merging entities
- Splitting entities
- Changing attribute types
- Non-optional changes without default values
- Custom transformation logic
Example: Renaming an Entity (User → Person)
class UserToPersonMigrationPolicy: NSEntityMigrationPolicy {
    override func createDestinationInstances(
        forSource sInstance: NSManagedObject,
        in mapping: NSEntityMapping,
        manager: NSMigrationManager
    ) throws {

        let dest = NSEntityDescription.insertNewObject(
            forEntityName: "Person",
            into: manager.destinationContext
        )

        dest.setValue(sInstance.value(forKey: "name"), forKey: "fullName")

        try super.createDestinationInstances(
            forSource: sInstance,
            in: mapping,
            manager: manager
        )
    }
}
Executing Manual Migration
let manager = NSMigrationManager(
    sourceModel: sourceModel,
    destinationModel: destinationModel
)

try manager.migrateStore(
    from: sourceURL,
    sourceType: NSSQLiteStoreType,
    options: nil,
    with: mappingModel,
    toDestinationURL: destinationURL,
    destinationType: NSSQLiteStoreType,
    destinationOptions: nil
)
Testing Core Data Migrations
func testMigration() throws {
    let oldStoreURL = Bundle.main.url(
        forResource: "OldModelStore",
        withExtension: "sqlite"
    )!

    let container = NSPersistentContainer(name: "MyAppModel")
    container.persistentStoreDescriptions = [
        NSPersistentStoreDescription(url: oldStoreURL)
    ]

    container.loadPersistentStores { _, error in
        XCTAssertNil(error)
    }
}
Migrations with NSPersistentCloudKitContainer
If your app uses Core Data + CloudKit:
- Migration still happens locally
- Sync occurs after migration
- Avoid schema-breaking changes after enabling CloudKit
Apple recommends:
“Keep CloudKit-compatible models stable across releases and plan migrations carefully.”
Apple-Recommended Best Practices
- Always create a new model version before changing the schema
- Prefer lightweight migration whenever possible
- Use Renaming IDs for renamed attributes
- Test migrations with real and synthetic data
- Avoid unnecessary schema changes in production
Conclusion
Core Data migration ensures your app evolves safely without losing user data.
- Lightweight migration handles most changes automatically
- Manual migration is for advanced transformations
- Always version, test, and back up your schema
With proper planning, migrations will be smooth and invisible to users.
Related Topics
Enjoyed this article?
Check out more blogs on our blog.